Materials needed:
1) Get your desired icon picture(around 22 x 22 pixel).
Steps:
1) Get an image of gif, jpg, bmp, ico, png type. Its dimension should be around 22x22 pixel(you can use Windows Paint to resize it).
2) Upload the image to ImageShack(http://imageshack.us/). Please login through the link sent to your email.
3) Click on "My Images" after you login.
4) You can see the image that you uploaded just now. Click on the "i" button.
5) Take note the link in the "Direct" field.
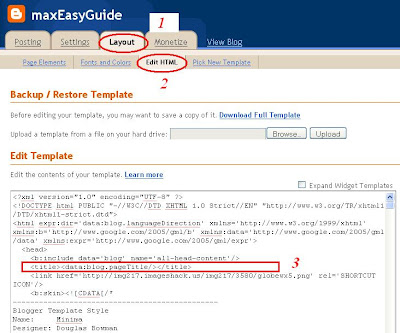
6) Now login to your blogspot and choose "Layout"->"Edit HTML". Look for "TITLE" in the template as shown in 3.
7) Paste the following codes after the "HEAD" as shown in print screen. The bold address will be from STEP 5.
#link href='http://img217.imageshack.us/img217/3580/globewx5.png' rel='SHORTCUT ICON'/'@
*please replace # with < and @ with > or else it wouldn't work.
8) Lastly, click on "SAVE TEMPLATE" and it's all set.
Tuesday, August 19, 2008
Change Display Icon Beside Address URL
Tuesday, June 10, 2008
Restore Default Folders Icon in Vista
Scenario:
A) One day, you open your profile and find that your beautiful Vista icon for Documents, Pictures, Music, Downloads folder is gone. Everything just revert back to old times yellow folder....
Materials needed:
1) Icon package(get the 'desktop.ini' for most folder)
Steps:
1) Go to your user profile folder and select the folder(for me, it's Documents) that you wish to transform back to default Vista icon.![]()
2) Double click to open the folder. Then go to 'Organize'->'Folder and Search Options'.![]()
3) Check 'Show hidden files and folders' and click 'OK'.![]()
4) Right now you should be able to see the file named 'desktop'. It's configurations types of file so it has .ini extension. (If you don't see any file by that name, don't panic. You can just copy and paste the desktop.ini from respective folders in the Icon package)![]()
*you might want to backup a copy of this file first.
5) Open the 'desktop' file. Copy following code(for Documents only) and replace it into the file content and save.
[.ShellClassInfo]
LocalizedResourceName=@%SystemRoot%\system32\shell32.dll,-21770
IconResource=%SystemRoot%\system32\imageres.dll,-112
IconFile=%SystemRoot%\system32\shell32.dll
IconIndex=-235
6) Log off windows and log in again to see the magic.![]()
7) Follow step (4) to (6) for other folder that has lost its 'true colours'. Just make sure you replace the right 'desktop' code from few code listed below or from the 'Icon package'.
For Pictures folder,
[.ShellClassInfo]
LocalizedResourceName=@%SystemRoot%\system32\shell32.dll,-21779
InfoTip=@%SystemRoot%\system32\shell32.dll,-12688
IconResource=%SystemRoot%\system32\imageres.dll,-113
IconFile=%SystemRoot%\system32\shell32.dll
IconIndex=-236
[LocalizedFileNames]
Sample Pictures.lnk=@%SystemRoot%\system32\shell32.dll,-21805
For Music folder,
[.ShellClassInfo]
LocalizedResourceName=@%SystemRoot%\system32\shell32.dll,-21790
InfoTip=@%SystemRoot%\system32\shell32.dll,-12689
IconResource=%SystemRoot%\system32\imageres.dll,-108
IconFile=%SystemRoot%\system32\shell32.dll
IconIndex=-237
[LocalizedFileNames]
Sample Music.lnk=@%SystemRoot%\system32\shell32.dll,-21806
For Downloads folder,
[.ShellClassInfo]
LocalizedResourceName=@%SystemRoot%\system32\shell32.dll,-21798
IconResource=%SystemRoot%\system32\imageres.dll,-184
Tuesday, June 3, 2008
Auto Ping Blueserver Using AutoHotkey
Options:
A) None.
Materials needed:
1) AutoHotkey (free from http://www.autohotkey.com).
Steps:
1) Install AutoHotkey and run AutoHotkey.
2) AutoHotkey shall appear at the taskbar.
3) Right click on it and select 'Edit This Script'.
4) Copy the text below and paste it in.
#MaxThreadsPerHotKey 10 ; Maximum time F7 can be activated
$F7:: ; F7 hotkey.
#MaxThreadsPerHotKey 1
if keepPing = y
{
keepPing = ; Make it blank to signal that thread's loop to stop.
return ; End this thread so that the one underneath will resume and see the change.
}
keepPing = y
Loop,
{
if keepPing = ; stop by pressing F7 again.
break
Send, {Enter}/p{Enter}
Sleep, 300000
}
keepPing = ; preparation for the next press of this hotkey.
return
5) And you will get this new script as shown below.
6) Close the script and right click on the AutoHotkey in the taskbar again. Select 'Reload This Script' to load your newly modified script.
7) To enable this Auto Ping script: in the blueserver game, hit 'F7' once to turn it on and hitting 'F7' again to switch it off.
Saturday, May 10, 2008
B) Shrink Vista Partition for WinXp Installation
Options:
A) If you have an available partition for WinXp installation, go to "WinXp Installation".
Materials needed:
1) PerfectDisk 2008(30 days trial version, download here).
Steps:
*make sure you backup the drive you going to shrink just in case anything goes wrong.
1) In Windows Vista, go to "Start", right click on "Computer" and choose "Manage". You will be prompted, just click "Continue".
2) Click on "Disk Management" and you will see the information of your hardisk installed.
3) Right click on the "VistatOS" drive, in my case it's "(C:)" and choose "Shrink Volume...".
4) By default Vista will give you the largest amount of space that you are able to shrink, it's not the free space that you have on that drive. Why?(If you want to find out, please refer to Query 1 or you are satisfied with the amount of space that you can shrink, just proceed to Step 5).
*Steps below followed after I use "PerfectDisk 2008" to empty more usable space for my XP drive. Need help on it? Go here: Get more usable space out of free space using PerfectDisk 2008
5) Please input the amount of space(in MB) for the new drive and allocate wisely, as you need to take into consideration of programs that you will install on this new drive, data storage and so on. I input "1000"(in MB) then only you click "Shrink".
6) Wait for new partition to be created. Then right click on it to choose "New Simple Volume...".
7) Click "Next".
8) Click "Next".
9) Now assign the drive letter(for my case, it's F).
10) Input the "Volume label" as "WinXp" for easy identification later and check "Perform quick format" as well.
11) Choose "Finish" and you have a new partition ready for WinXp installation. Proceed to normal WinXp installation procedure.
Proceed to?
A) If you have an empty partition for WinXp installation, proceed to "WinXp Installation".
Wednesday, April 30, 2008
Extracting SATA driver from their EXE without Floppy Disk(FD) drive.
Options:
Obiously, you don't have any option to use Floppy Disk.
Materials needed:
1) SATA drivers(from your respective chipset manufacturer website, for me it's intel http://downloadcenter.intel.com)
2) WinImage(30 days trial copy from http://www.winimage.com)
Steps:
1) Download the intel SATA drivers. Make sure you get the correct file by downloading something called "Floppy Configuration Utility".
2) Extract the file and you will get green icon "f6flpy32".
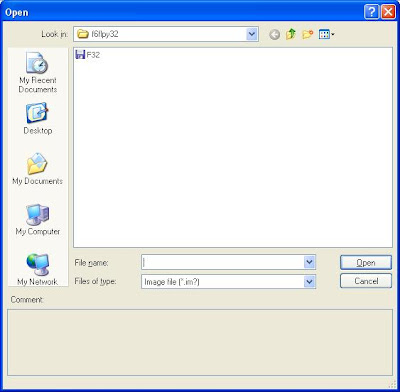
3) Extract the "f6flpy32" again and you will get this a file with .IMA extension.
4) Ok, now you need to open up WinImage and browse to the latest extracted folder "f6flpy32" to load the .IMA file.
5) TATA, you will see all the SATA driver files needed for slipstreaming WinXp using nLite. Before you can use them, extract them to any folder(I name it "SATA driver" on my desktop) by selecting all of the files and choose "Extract".
6) You will be prompted, choose "Extract all files into the same folder".
7) If you open up the "SATA driver" folder, the content is exactly the same with the content Floppy Disk. The difference is that you don't need a FD.
Proceed to?
A) Guide for "Slipstreaming SATA driver into WinXp boot cd using nLite"
Monday, April 28, 2008
A) Slipstreaming SATA driver into WinXp boot cd using nLite
Options:
A) If you don't have Floppy Disk Drive especially on a notebook. You still can install Win Xp but you need to read the "Slipstreaming SATA driver into WinXp boot cd using nLite".
B) If you have FD drive, skip this step and go to "Shrink Vista Partition for WinXp Installation".
C) If you have an empty partition for WinXp installation, proceed to "WinXp Installation"
Materials needed:
1) nLite(download here), a free tool to help you slipstreaming(integrate) your SATA drivers into WinXp installation disk.
2) Extracted SATA drivers(if you are using Intel chipset Intel 82801GR/GH, 631xESB/632xESB, 82801GHM, ICH8R/ICH9R, 82801HEM SATA RAID Controller, get the drivers from here)
Steps:
1) Get your Windows XP installation disk and copy the contents to a new folder(I named it "WinXp").
2) Extract the SATA drivers you downloaded into a folder, namely "Floppy 32Bit". (Need help for "Extracting SATA driver from their EXE without Floppy Disk(FD)")
3) Run nLite->choose "Next".
4) Now, locate the Windows folder(for me, it's "WinXp").
5) Next again and you will come to "Presets". Ignore this by choosing "Next" again.
6) In "Task Selection", choose "Drivers" and "Bootable ISO" by high-lighting them.
7) Choose "Insert"->"Single driver"
8) Browse to the SATA driver folder(I named it "Floppy 32Bit") and select either one of the .INF file, I choose "iaahci.inf".
9) A screen like below will pop-up, make sure it's "Textmode driver" and select all of them by holding CTRL+A key and choose "OK"
10) You shall see something like this. Choose "Next" and you will be prompted.
11) Choose "Yes" to start the process.
12) Let it finish and choose "Next".
13) Finally, you can create your project as ISO image or burn it directly to CD-R under "Mode". I choose "Direct Burn". You can put anything for "Label" but not too long. Choose "Burn" and you will be prompted again.
14) Choose "Yes" to burn it to CD-R. Wait for it to finish and choose "Next"
15) Choose "Finish" to exit nLite.
Proceed to?
A) Go to "Shrink Vista Partition for WinXp Installation" if you don't have any partition to use.
B) If you have an empty partition for WinXp installation, proceed to "WinXp Installation"


